


html5өЗВјІЈБ§ҪзГжМШР§
·ўІјКұјдЈә2023-12-12 16:20:06 ЧчХЯЈәДгөДГАЈ¬ИГОТіХГФ  ОТТӘЖАВЫ
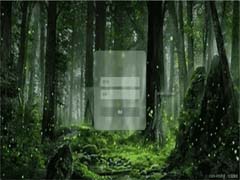
ұҫОДЦчТӘҪйЙЬБЛhtml5өЗВјІЈБ§ҪзГжМШР§Ј¬ОДЦРНЁ№эКҫАэҙъВлҪйЙЬөД·ЗіЈПкПёЈ¬¶ФҙујТөДС§П°»тХЯ№ӨЧчҫЯУРТ»¶ЁөДІОҝјС§П°јЫЦөЈ¬РиТӘөДЕуУСГЗПВГжЛжЧЕРЎұаАҙТ»ЖрС§П°С§П°°Й
ЈЁёЈАыНЖјцЈәДг»№ФЪФӯјЫ№әВт°ўАпФЖ·юОсЖчЈҝПЦФЪ°ўАпФЖ0.8ХЫПЮКұЗА№ә»о¶ҜАҙАІЈЎ4әЛ8GЖуТөФЖ·юОсЖчҪц2998ФӘ/3ДкЈ¬БўјҙЗА№ә>>>Јә9i0i.cn/aliyunЈ©
ұҫОДЦчТӘҪйЙЬБЛhtml5өЗВјІЈБ§ҪзГжМШР§Ј¬·П»°І»¶аЛөЈ¬ҫЯМеИзПВЈә
<!DOCTYPE html>
<html lang="en">
<head>
<meta charset="UTF-8">
<meta name="viewport" content="width=device-width, initial-scale=1.0">
<meta http-equiv="X-UA-Compatible" content="ie=edge"></meta>
<title>Document</title>
<style>
html,
body {
margin: 0;
padding: 0;
font-family: "PingFang SC", "Microsoft Yahei", sans-serif;
}
.container {
width: 100vw;
height: 100vh;
display: flex;
align-items: center;
justify-content: center;
background: url("https://tse3-mm.cn.bing.net/th/id/OIP-C.8lHGYyoBPuSLsS6yFB5ACwHaEK?w=321&h=180&c=7&r=0&o=5&dpr=1.3&pid=1.7") fixed no-repeat;
background-size: cover;
}
.login-form {
width: 240px;
height: 220px;
display: flex;
flex-direction: column;
padding: 40px;
text-align: center;
position: relative;
z-index: 100;
background: inherit;
border-radius: 18px;
overflow: hidden;
}
.login-form::before {
content: "";
width: calc(100% + 20px);
height: calc(100% + 20px);
background: inherit;
box-shadow: inset 0 0 0 200px rgba(255, 255, 255, 0.25);
position: absolute;
top: -10px;
left: -10px;
z-index: -1;
filter: blur(6px);
overflow: hidden;
}
.login-form h2 {
font-size: 18px;
font-weight: 400;
color: #3d5245;
}
.login-form input,
.login-form button {
margin: 6px 0;
height: 36px;
border: none;
background-color: rgba(255, 255, 255, 0.3);
border-radius: 4px;
padding: 0 14px;
color: #3d5245;
}
.login-form input::placeholder {
color: #3d5245;
}
.login-form button {
margin-top: 24px;
background-color: rgba(57, 88, 69, 0.4);
color: white;
position: relative;
overflow: hidden;
cursor: pointer;
transition: 0.4s;
}
.login-form button:hover {
background-color: rgba(12, 80, 38, 0.67);
}
.login-form button::before,
.login-form button::after {
content: "";
display: block;
width: 80px;
height: 100%;
background: rgba(179, 255, 210, 0.5);
opacity: 0.5;
position: absolute;
left: 0;
top: 0;
transform: skewX(-15deg);
filter: blur(30px);
overflow: hidden;
transform: translateX(-100px);
}
.login-form button::after {
width: 40px;
background: rgba(179, 255, 210, 0.3);
left: 60px;
filter: blur(5px);
opacity: 0;
}
.login-form button:hover::before {
transition: 1s;
transform: translateX(320px);
opacity: 0.7;
}
.login-form button:hover::after {
transition: 1s;
transform: translateX(320px);
opacity: 1;
}
</style>
</head>
<body>
<div>
<div class="container">
<form action="#" class="login-form">
<h2>өЗВј</h2>
<input type="text" name="username" placeholder="УГ»§Гы">
<input type="password" name="password" placeholder="ГЬВл">
<button type="submit">өЗВј</button>
</form>
</div>
</div>
</body>
</html>
өҪҙЛХвЖӘ№ШУЪhtml5өЗВјІЈБ§ҪзГжМШР§өДОДХВҫНҪйЙЬөҪХвБЛ,ёь¶аПа№Шhtml5өЗВјІЈБ§ДЪИЭЗлЛСЛчіМРтФұЦ®јТТФЗ°өДОДХВ»тјМРшдҜААПВГжөДПа№ШОДХВЈ¬ПЈНыҙујТТФәу¶а¶аЦ§іЦіМРтФұЦ®јТЈЎ
Па№ШОДХВ
 ұҫОДЦчТӘҪйЙЬБЛhtml5өЗВјІЈБ§ҪзГжМШР§Ј¬ОДЦРНЁ№эКҫАэҙъВлҪйЙЬөД·ЗіЈПкПёЈ¬¶ФҙујТөДС§П°»тХЯ№ӨЧчҫЯУРТ»¶ЁөДІОҝјС§П°јЫЦөЈ¬РиТӘөДЕуУСГЗПВГжЛжЧЕРЎұаАҙТ»ЖрС§П°С§П°°Й2023-12-12
Canvas»ӯІјдЦИҫІ»іцАҙөДОКМвҪвҫц
С§П°CanvasөДКұәтЈ¬ҙтЛгГи»жТ»ёцҫШРОІўІвКФЗеіэ»ӯІј·Ҫ·ЁКұЈ¬ө«КЗ·ўПЦ»ӯІјдЦИҫІ»іцАҙЈ¬ұҫОДҫНАҙҪйЙЬТ»ПВёГОКМвөДҪвҫцЈ¬ҫЯУРТ»¶ЁөДІОҝјјЫЦөЈ¬ёРРЛИӨөДҝЙТФБЛҪвТ»ПВ2023-12-05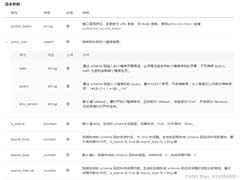 КөјКҝӘ·ўЦРЈ¬РЎіМРтәНH5НщНщУРәЬ¶аТөОсіЎҫ°РиТӘАҙ»ШМшЧӘЈ¬ұҫОДҫНАҙҪйЙЬТ»ПВHtml5ТіГжМшЧӘРЎіМРтөДИэЦЦ·ҪКҪЈ¬ёРРЛИӨөДҝЙТФБЛҪвТ»ПВ2023-12-04
 HTML5ұкЗ©КЗHTMLУпСФөДЧоРВ°жұҫТэИлөДТ»Р©РВөДұкЗ©Ј¬ХвР©ұкЗ©УГУЪ¶ЁТеНшТіДЪИЭөДҪб№№әНУпТе,ПаұИУЪТФЗ°өДHTML°жұҫЈ¬HTML5ұкЗ©МṩБЛёьјУУпТе»ҜөДФӘЛШЈ¬ұҫОДҫНёшҙујТҪйЙЬHTM2023-11-07
elementUIЦРel-date-pickerИзәОҪыУГЦё¶ЁИХЖЪЦ®З°»тЦ®әуөДИХЖЪ
ХвЖӘОДХВҪйЙЬelementUIЦРel-date-pickerҪыУГЦё¶ЁИХЖЪЦ®З°»тЦ®әуөДИХЖЪЈ¬НЁ№эЕдЦГpicker-optionsЕдЦГЦё¶ЁҪыУГИХЖЪЈЁpickerOptionsРҙөҪdataАпГжЈ©Ј¬ёРРЛИӨөДЕуУСёъЛжРЎұаТ»Жр2023-10-18metaұкЗ©name="referrer"КфРФјтҪйәНУГ·ЁРЎҪб
HTML<meta>ұкЗ©name="referrer"КфРФЦчТӘУГУЪҝШЦЖНшТі·ўЛНёш·юОсЖчөДreferrerРЕПўЈ¬ҝЙТФёжЛЯ·юОсЖч¶ЛУГ»§КЗҙУДДёцТіГжАҙөҪөұЗ°НшТіөД,ұҫЖӘОДХВёшҙујТҪйЙЬme2023-10-18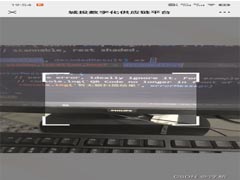 ЙЁГи¶юО¬ВлКЗәЬіЈјыөДТ»ЦЦ№ҰДЬЈ¬ұҫОДҫНАҙҪйЙЬТ»ПВhtml5ПоДҝКөПЦЙЁГи¶юО¬Вл№ҰДЬЈ¬ҫЯУРТ»¶ЁөДІОҝјјЫЦөЈ¬ёРРЛИӨөДҝЙТФБЛҪвТ»ПВ2023-10-07
HTML5КөПЦН¬КұСЎФс¶аёцОДјюјРЙПҙ«өДК№УГКҫАэ
HTML5өДЙПҙ«APIҝЙТФЦ§іЦН¬КұСЎФс¶аёцОДјюәНСЎФсөҘёцОДјюјРЈ¬ө«І»Ц§іЦН¬КұСЎФс¶аёцОДјюјРЈ¬ұҫОДҫНАҙКөПЦТ»ПВHTML5КөПЦН¬КұСЎФс¶аёцОДјюјРЙПҙ«өДК№УГКҫАэЈ¬ҫЯУРТ»¶ЁөДІОҝјјЫ2023-09-28Html5 video ұкЗ© src УГКэҫЭБч·ҪКҪІҘ·ЕКУЖө
HTML5ЦРөДvideoұкЗ©УГУЪІҘ·ЕКУЖөОДјюөДЈ¬ұҫОДҪйЙЬБЛHtml5 video ұкЗ© src УГКэҫЭБч·ҪКҪІҘ·ЕКУЖөЈ¬ҫЯУРТ»¶ЁөДІОҝјјЫЦөЈ¬ёРРЛИӨөДҝЙТФБЛҪвТ»ПВ2023-09-27H5К№УГVantЧФККУҰІјҫЦ(postcss-pxtorem)
ұҫОДҪ«ҪйЙЬИзәОК№УГVantЧйјюҝвЦРөДЧФККУҰІјҫЦАҙКөПЦH5ТіГжөДУЕ»ҜәНККЕдЈ¬ҝЙТФК№H5ТіГжҙпөҪёьјСөДУГ»§МеСй,ҫЯУРТ»¶ЁөДІОҝјјЫЦөЈ¬ёРРЛИӨөДҝЙТФБЛҪвТ»ПВ2023-09-20


ЧоРВЖАВЫ