


iOS 底层alloc init new 源码流程示例分析
(福利推荐:你还在原价购买阿里云服务器?现在阿里云0.8折限时抢购活动来啦!4核8G企业云服务器仅2998元/3年,立即抢购>>>:9i0i.cn/aliyun)
alloc&init 的源码流程图

首先创建Person 类, 在main函数创建Person 实例 Person *p = [Person alloc]; 1.进入到alloc 方法的源码实现
+ (id)alloc {
return _objc_rootAlloc(self);
}
2.跳转到_objc_rootAlloc 源码实现
id
_objc_rootAlloc(Class cls)
{
    return callAlloc(cls, false/*checkNil*/, true/*allocWithZone*/);
}
3.跳转至 callAlloc 的源码实现
static ALWAYS_INLINE id
callAlloc(Class cls, bool checkNil, bool allocWithZone=false)
{
#if __OBJC2__ //有可用的编译器优化
    if (slowpath(checkNil && !cls)) return nil;
    //判断是否自定义实现了 +allocWithZone 方法
    if (fastpath(!cls->ISA()->hasCustomAWZ())) {
        return _objc_rootAllocWithZone(cls, nil);
    }
    #endif
    // No shortcuts available.
    if (allocWithZone) {
        return ((id(*)(id, SEL, struct _NSZone *))objc_msgSend)(cls, @selector(allocWithZone:), nil);
    }
    return ((id(*)(id, SEL))objc_msgSend)(cls, @selector(alloc));
该方法中有两个定义的宏
#define fastpath(x) (__builtin_expect(bool(x), 1))
#define slowpath(x) (__builtin_expect(bool(x), 0))
其中__builtin_expect指令由gcc 引入,目的:1. 编译器可以对代码进行优化,以减少指令跳转带来的性能下降,2.作用: 允许程序员将最有可能执行的分支告诉编译器;3.写法为: __builtin_expect(EXP, N) , 表示 EXP == N的概率很大;
fastPath 定义的__builtin_expect(bool(x), 1) 表示x 的值为真的可能性更大;
slowpath 定义的__builtin_expect(bool(x), 0) 表示x 的值为假的可能性更大;
日常开发中可以通过设置来优化编译器,达到性能优化的目的,设置路径: Build Settiing -> Optimization Level -> Debug -> 将None 改为fastest/smallest 4.跳转至 _objc_rootAllocWithZone 的源码实现
id
_objc_rootAllocWithZone(Class cls, objc_zone_t zone __unused)
{
    // allocWithZone under __OBJC2__ ignores the zone parameter
    return _class_createInstanceFromZone(cls, 0, nil,
OBJECT_CONSTRUCT_CALL_BADALLOC);
}
5.跳转至 _class_createInstanceFromZone 源码实现
static ALWAYS_INLINE id
_class_createInstanceFromZone(Class cls, size_t extraBytes, void *zone,int construct_flags = OBJECT_CONSTRUCT_NONE,bool cxxConstruct = true,size_t *outAllocatedSize = nil)
{
    ASSERT(cls->isRealized());
    // Read class's info bits all at once for performance
    // 一次性读取累的的信息以提高性能
    bool hasCxxCtor = cxxConstruct && cls->hasCxxCtor();
    bool hasCxxDtor = cls->hasCxxDtor();
    bool fast = cls->canAllocNonpointer();
    size_t size;
    size = cls->instanceSize(extraBytes);
    if (outAllocatedSize) *outAllocatedSize = size;
    id obj;
#if SUPPORT_ZONES
    // 支持zone
    // 早期的内存是通过zone  申请的 ilo89i='
    if (zone) {
        obj = (id)malloc_zone_calloc((malloc_zone_t *)zone, 1, size);
    } else {
#endif
        obj = (id)calloc(1, size);
#if SUPPORT_ZONES
    }
#endif
    if (slowpath(!obj)) {
        if (construct_flags & OBJECT_CONSTRUCT_CALL_BADALLOC) {
            return _objc_callBadAllocHandler(cls);
        }
        return nil;
    }
    if (!zone && fast) {
        obj->initInstanceIsa(cls, hasCxxDtor);
    } else {
        // Use raw pointer isa on the assumption that they might be
        // doing something weird with the zone or RR.
        obj->initIsa(cls);
    }
    if (fastpath(!hasCxxCtor)) {
        return obj;
    }
    construct_flags |= OBJECT_CONSTRUCT_FREE_ONFAILURE;
    return object_cxxConstructFromClass(obj, cls, construct_flags);
}
该方法中有三个核心方法:
- cls->instanceSize:计算所需内存大小, 源码实现
inline size_t instanceSize(size_t extraBytes) const {
// 快速计算内存大小
        if (fastpath(cache.hasFastInstanceSize(extraBytes))) {
            return cache.fastInstanceSize(extraBytes);
        }
        size_t size = alignedInstanceSize() + extraBytes;
        // CF requires all objects be at least 16 bytes.
        if (size < 16) size = 16;
        return size;
    }
fastInstanceSize 的源码实现
size_t fastInstanceSize(size_t extra) const
    {
        ASSERT(hasFastInstanceSize(extra));
        if (__builtin_constant_p(extra) && extra == 0) {
            return _flags & FAST_CACHE_ALLOC_MASK16;
        } else {
            size_t size = _flags & FAST_CACHE_ALLOC_MASK;
            // remove the FAST_CACHE_ALLOC_DELTA16 that was added
            // by setFastInstanceSize
            return align16(size + extra - FAST_CACHE_ALLOC_DELTA16);
        }
    }
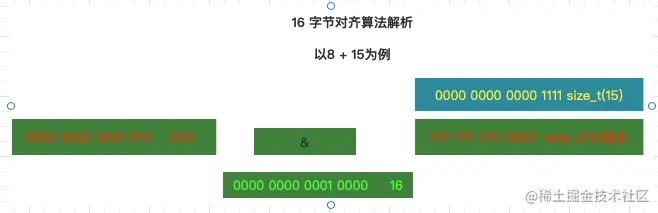
align16的源码实现
static inline size_t align16(size_t x) {
    return (x + size_t(15)) & ~size_t(15);
}
断点调试此处的参数x 为8 即: align16(8)
2.calloc 申请内存,返回地址指针 向内存中申请大小为 instanceSize计算的内存, 并将内存地址的指针返回,赋值给obj,obj = (id)calloc(1, size);
3.obj->initInstanceIsa(cls, hasCxxDtor); : 初始化isa 指针 并将类与isa 关联
Init 源码探索
通过查看 Init 源码
- (id)init {
    return _objc_rootInit(self);
}
id
_objc_rootInit(id obj)
{
    // In practice, it will be hard to rely on this function.
    // Many classes do not properly chain -init calls.
    return obj;
}
通过源码实现可以看到 Init 就是将传入的对象 直接返回
new 的源码探索
日常开发中,对象的创建 有 alloc Init 和new , 现在看下new的源码实现
+ (id)new {
    return [callAlloc(self, false/*checkNil*/) init];
}
通过源码可以看出 new 相当于alloc init 过程,但是二者有何区别 以下是其他博主总结的, 引用一下

以上就是iOS 底层alloc init new 源码流程示例分析的详细内容,更多关于iOS 底层alloc init new分析的资料请关注程序员之家其它相关文章!
相关文章
 本篇文章主要介绍了iOS贝塞尔曲线画哆啦A梦的代码实例,这里整理了详细的代码,具有一定的参考价值,感兴趣的小伙伴们可以参考一下。2017-07-07
 这篇文章主要为大家详细介绍了iOS第三方框架二维码生成与扫描,具有一定的参考价值,感兴趣的小伙伴们可以参考一下2018-10-10
 这篇文章主要介绍了如何在IOS上使用ReplayKit 与 RTC,对IOS音视频感兴趣的同学,一定要看一下2021-04-04
 这篇文章主要为大家详细介绍了iOS实现音乐播放器图片旋转,文中示例代码介绍的非常详细,具有一定的参考价值,感兴趣的小伙伴们可以参考一下2020-10-10
实例讲解iOS中的UIPageViewController翻页视图控制器
UIPageViewController更像是一个视图容器,将每页不同的ViewController整合,这里我们将以实例讲解iOS中的UIPageViewController翻页视图控制器:2016-06-06 本文主要介绍了iOS常用的公共方法,具有一定的参考价值,下面跟着小编一起来看下吧2016-12-12
 这篇文章主要介绍了iOS获取设备唯一标识的实现步骤,帮助大家更好的理解和学习ios开发,感兴趣的朋友可以了解下2021-04-04
 这篇文章主要介绍了解析iOS开发中的FirstResponder第一响应对象,包括View的FirstResponder的释放问题,需要的朋友可以参考下2015-10-10
 这篇文章主要介绍了讲解Java中如何构造内部类对象以及访问对象,是Java入门学习中的基础知识,需要的朋友可以参考下2015-09-09
 这篇文章主要给大家介绍了关于iOS中CPU线程调试的高级技巧,文中通过示例代码介绍的非常详细,对大家的学习或者工作具有一定的参考学习价值,需要的朋友们下面随着小编来一起学习学习吧2018-11-11


最新评论