


使用Rust制作康威生命游戏的实现代码
更新时间:2022年09月27日 11:46:26 作者:业火之理
这篇文章主要介绍了使用Rust制作康威生命游戏,初始rust项目,使用wasm的项目模板,结合实例代码给大家介绍的非常详细,对大家的学习或工作具有一定的参考借鉴价值,需要的朋友可以参考下
(福利推荐:【腾讯云】服务器最新限时优惠活动,云服务器1核2G仅99元/年、2核4G仅768元/3年,立即抢购>>>:9i0i.cn/qcloud)
(福利推荐:你还在原价购买阿里云服务器?现在阿里云0.8折限时抢购活动来啦!4核8G企业云服务器仅2998元/3年,立即抢购>>>:9i0i.cn/aliyun)
前言
之前学了几遍,后来忘记了,通过制作该游戏再复习复习。
安装准备
- wasm-pack : https://rustwasm.github.io/wasm-pack/installer/
- cargo-generate:
cargo install cargo-generate
初始项目
初始rust项目
使用wasm的项目模板:
cargo generate --git https://github.com/rustwasm/wasm-pack-template
- 提示输入project名wasm-game-of-life
- 在lib.rs中可以看见如下内容:
mod utils;
use wasm_bindgen::prelude::*;
// When the `wee_alloc` feature is enabled, use `wee_alloc` as the global
// allocator.
#[cfg(feature = "wee_alloc")]
#[global_allocator]
static ALLOC: wee_alloc::WeeAlloc = wee_alloc::WeeAlloc::INIT;

#[wasm_bindgen]
extern {
    fn alert(s: &str);
}

#[wasm_bindgen]
pub fn greet() {
    alert("Hello, wasm-game-of-life!");
}- 它导入 window.alertJavaScript 函数,并导出greet的Rust 函数。
Cargo.toml
- Cargo.toml预置了[lib]和[dependencies]。解释一下crate-type中f=“https://users.rust-lang.org/t/what-is-the-difference-between-dylib-and-cdylib/28847”>cdylib和rlib的作用:
- cdylib:顾名思义,是C的动态链接库的意思,可以被C和C++程序链接使用
- rlib:Rust静态链接库,用于静态连接其他crates
- 依赖中使用的:
- wasm-bindgen可以将Rust编写的函数和结构体暴露到JS中或者把JS的方法引入到Rust中使用
- console_error_panic_hook提供了Wasm输出Rust Panic的能力
- wee_alloc是一个轻量的Wasm内存分配器,但是会比默认分配器慢一些。
初始web项目
npm init wasm-app www
- 看到生成的pkg.json:
{
  "name": "create-wasm-app",
  "version": "0.1.0",
  "description": "create an app to consume rust-generated wasm packages",
  "main": "index.js",
  "bin": {
    "create-wasm-app": ".bin/create-wasm-app.js"
  },
  "scripts": {
    "build": "webpack --config webpack.config.js",
    "start": "webpack-dev-server"
},- html里导入boostrap.js,boostrap.js里导入index.js。 index.js里面导入了其已经制作好的一个包:
import * as wasm from "hello-wasm-pack";
wasm.greet();
- 我们修改pkg.json,导入自己的包(该包需要使用
wasm-pack build生成)
"wasm-game-of-life": "file:../pkg"
- 将index.js更换下:
import * as wasm from "wasm-game-of-life";
wasm.greet();
- 使用npm i 安装依赖。
- 使用npm run start 启动页面,打开http://localhost:8080/即可看见alert。
游戏规则
- Conway’s Game of Life是英国数学家约翰·何顿·康威在1970年发明的放置类无玩家参与的游戏
- 百度百科
- https://baike.baidu.com/item/%E5%BA%B7%E5%A8%81%E7%94%9F%E5%91%BD%E6%B8%B8%E6%88%8F/22668799?fr=aladdin主要规则如下:
- 1、任何少于两个活邻居的活细胞都会死亡,就像是由于人口不足造成的。
- 2、任何有两三个活邻居的活细胞都可以活到下一代。
- 3、任何有超过三个活邻居的活细胞都会死亡,就像人口过剩一样。
- 4、任何只有三个活邻居的死细胞都会变成活细胞,就像通过繁殖一样。
游戏设计
- 为啥说这个呢,因为2种语言去做这个东西会考虑哪个东西在哪个里面去实现。
- rust推荐大型、长寿命的数据结构被实现为 Rust 类型,这些类型存在于 WebAssembly 线性内存中,并作为不透明的句柄暴露给 JavaScript。JavaScript 调用导出的 WebAssembly 函数,这些函数采用这些不透明的句柄、转换它们的数据、执行繁重的计算、查询数据并最终返回一个可复制的结果。通过只返回计算结果,我们避免了在 JavaScript 垃圾收集堆和 WebAssembly 线性内存之间来回复制和/或序列化所有内容。
- 这个游戏中,会将universe的显示效果暴露给js渲染,其余计算在rust去实现。
- 由于宇宙是n*n的,所以我们可以用一维数组去表示它,比如4x4的宇宙就是这样:
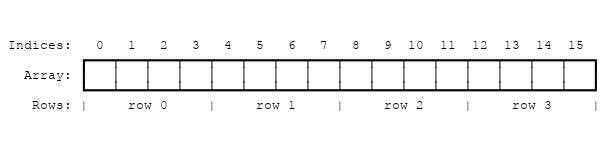
- 将数组每个row换下来就是需要的4x4的显示了。因为这种表现形式,所以我们需要对数组索引和行列进行转换,公式为:
index(row, column, universe) = row * width(universe) + column
- 就比如我要知道4行4列是索引几,根据公式就是3*4 + 3。
- 每个单元格有一个字节,其中0表示死亡,1表示存活。
Rust实现
首先我们需要定义每个单元格:
#[wasm_bindgen]
#[repr(u8)]
#[derive(Clone, Copy, Debug, PartialEq, Eq)]
pub enum Cell {
    Dead = 0,
    Alive = 1,
}枚举类型,0是死亡,1是存活,#[repr(u8)]表示一个单元格1字节。复习下:
| 长度 | 有符号 | 无符号 |
|---|---|---|
| 8-bit | i8 | u8 |
| 16-bit | i16 | u16 |
| 32-bit | i32 | u32 |
| 64-bit | i64 | u64 |
| 128-bit | i128 | u128 |
| arch | isize | usize |
接下来定义宇宙:
#[wasm_bindgen]
pub struct Universe {
    width: u32,
    height: u32,
    cells: Vec<Cell>,
}
- 宇宙是长宽和一个动态数组。
- 我们对universe实现一些方法便于操作:
#[wasm_bindgen]
impl Universe {
    fn get_index(&self, row: u32, column: u32) -> usize {
        (row * self.width + column) as usize
    }
}- get_index就是上面公式做索引。
- 从前面游戏规则上可知,我们需要对每个单元格求出周围格子的存活数量,于是加上这个函数:
  fn live_neighbor_count(&self, row: u32, column: u32) -> u8 {
        let mut count = 0;
        for delta_row in [self.height - 1, 0, 1].iter().cloned() {
            for delta_col in [self.width - 1, 0, 1].iter().cloned() {
                if delta_row == 0 && delta_col == 0 {
                    continue;
                }
                let neighbor_row = (row + delta_row) % self.height;
                let neighbor_col = (column + delta_col) % self.width;
                println!("{},{}-s-", neighbor_row, neighbor_col);
                let idx = self.get_index(neighbor_row, neighbor_col);
                count += self.cells[idx] as u8;
            }
        }
        count
    }
- 解释下这个函数,其中迭代height-1 , 0 , 1 以及 width-1,0,1就是求传入row与col的周围的格子里存活数量。当迭代到0,0时,这个格子代表其自身,所以直接忽略。
- 比如64x64的宇宙,查询2,2周围的格子就是:
1,1
1,2
1,3
2,1
2,3
3,1
3,2
3,3
- 边界处理靠取余,这样也能避免无符号向下溢出,所以0,0的周围格子就是:
63,63
63,0-
63,1
0,63
0,1
1,63
1,0
1,1
- 再从当前宇宙中获取格子的状态,如果是0,那么加上也不会增加,这样最终返回的就是周围格子的存活数量了。
- 下面根据规则迭代每个细胞状态,暴露出来:
 pub fn tick(&mut self) {
        let mut next = self.cells.clone();
        for row in 0..self.height {
            for col in 0..self.width {
                let idx = self.get_index(row, col);
                let cell = self.cells[idx];
                let live_neighbors = self.live_neighbor_count(row, col);
                let next_cell = match (cell, live_neighbors) {
                    // Rule 1: Any live cell with fewer than two live neighbours
                    // dies, as if caused by underpopulation.
                    (Cell::Alive, x) if x < 2 => Cell::Dead,
                    // Rule 2: Any live cell with two or three live neighbours
                    // lives on to the next generation.
                    (Cell::Alive, 2) | (Cell::Alive, 3) => Cell::Alive,
                    // Rule 3: Any live cell with more than three live
                    // neighbours dies, as if by overpopulation.
                    (Cell::Alive, x) if x > 3 => Cell::Dead,
                    // Rule 4: Any dead cell with exactly three live neighbours
                    // becomes a live cell, as if by reproduction.
                    (Cell::Dead, 3) => Cell::Alive,
                    // All other cells remain in the same state.
                    (otherwise, _) => otherwise,
                };
                next[idx] = next_cell;
            }
        }
        self.cells = next;
    }
- 最后需要对universe实现输出功能,先将其输出成文本,实现display方法:
impl fmt::Display for Universe {
    fn fmt(&self, f: &mut fmt::Formatter) -> fmt::Result {
        for line in self.cells.as_slice().chunks(self.width as usize) {
            for &cell in line {
                let symbol = if cell == Cell::Dead { '?' } else { '?' };
                write!(f, "{}", symbol)?;
            }
            write!(f, "\n")?;
        }
        Ok(())
    }
}
最后进行暴露初始化和渲染方法:
pub fn new() -> Universe {
        let width = 64;
        let height = 64;

        let cells = (0..width * height)
            .map(|i| {
                if i % 2 == 0 || i % 7 == 0 {
                    Cell::Alive
                } else {
                    Cell::Dead
                }
            })
            .collect();

        Universe {
            width,
            height,
            cells,
        }
    }

    pub fn render(&self) -> String {
        self.to_string()
    }
- 使用wasm-pack build打包
- 使用js渲染,修改html加入标签:
<pre id="game-of-life-canvas"></pre>
index.js加入下面代码:
import { Universe } from "wasm-game-of-life";
const pre = document.getElementById("game-of-life-canvas");
const universe = Universe.new();
const renderLoop = () => {
	pre.textContent = universe.render();
	universe.tick();
	requestAnimationFrame(renderLoop);
};
renderLoop();- 即可看见效果。
- 下面使用canvas进行渲染,将universe中暴露其属性:
    pub fn width(&self) -> u32 {
        self.width
    }

    pub fn height(&self) -> u32 {
        self.height
    }

    pub fn cells(&self) -> *const Cell {
        self.cells.as_ptr()
    }
- html中替换为canvas:
<canvas id="game-of-life-canvas"></canvas>
修改js:
import { Universe, Cell } from "wasm-game-of-life";
import { memory } from "wasm-game-of-life/wasm_game_of_life_bg";
const CELL_SIZE = 5; // px
const GRID_COLOR = "#CCCCCC";
const DEAD_COLOR = "#FFFFFF";
const ALIVE_COLOR = "#000000";
const universe = Universe.new();
const width = universe.width();
const height = universe.height();

// Give the canvas room for all of our cells and a 1px border
// around each of them.
const canvas = document.getElementById("game-of-life-canvas");
canvas.height = (CELL_SIZE + 1) * height + 1;
canvas.width = (CELL_SIZE + 1) * width + 1;

const ctx = canvas.getContext("2d");
const drawGrid = () => {
	ctx.beginPath();
	ctx.strokeStyle = GRID_COLOR;
	// Vertical lines.
	for (let i = 0; i <= width; i++) {
		ctx.moveTo(i * (CELL_SIZE + 1) + 1, 0);
		ctx.lineTo(i * (CELL_SIZE + 1) + 1, (CELL_SIZE + 1) * height + 1);
	}
	// Horizontal lines.
	for (let j = 0; j <= height; j++) {
		ctx.moveTo(0, j * (CELL_SIZE + 1) + 1);
		ctx.lineTo((CELL_SIZE + 1) * width + 1, j * (CELL_SIZE + 1) + 1);
	}
	ctx.stroke();
};
const getIndex = (row, column) => {
	return row * width + column;
};

const drawCells = () => {
	const cellsPtr = universe.cells();
	const cells = new Uint8Array(memory.buffer, cellsPtr, width * height);
	ctx.beginPath();
	for (let row = 0; row < height; row++) {
		for (let col = 0; col < width; col++) {
			const idx = getIndex(row, col);
			ctx.fillStyle = cells[idx] === Cell.Dead ? DEAD_COLOR : ALIVE_COLOR;
			ctx.fillRect(
				col * (CELL_SIZE + 1) + 1,
				row * (CELL_SIZE + 1) + 1,
				CELL_SIZE,
				CELL_SIZE
			);
		}
	}
	ctx.stroke();
};
const renderLoop = () => {
	universe.tick();
	drawGrid();
	drawCells();
	requestAnimationFrame(renderLoop);
};
renderLoop();
即可看见效果:

测试
- 一般代码需要写单元测试,看一下rust的测试怎么写。
- 首先,对Universe增加2个实现,可以将元组转换为universe的cell:
impl Universe {
    /// Get the dead and alive values of the entire universe.
    pub fn get_cells(&self) -> &[Cell] {
        &self.cells
    }

    /// Set cells to be alive in a universe by passing the row and column
    /// of each cell as an array.
    pub fn set_cells(&mut self, cells: &[(u32, u32)]) {
        for (row, col) in cells.iter().cloned() {
            let idx = self.get_index(row, col);
            self.cells[idx] = Cell::Alive;
        }
    }
}
新增重置的方法:
  /// Set the width of the universe.
    ///
    /// Resets all cells to the dead state.
    pub fn set_width(&mut self, width: u32) {
        self.width = width;
        self.cells = (0..width * self.height).map(|_i| Cell::Dead).collect();
    }

    /// Set the height of the universe.
    ///
    /// Resets all cells to the dead state.
    pub fn set_height(&mut self, height: u32) {
        self.height = height;
        self.cells = (0..self.width * height).map(|_i| Cell::Dead).collect();
    }
- 下面编写测试,测试在tests文件夹下的web.rs中。
- 增加以下代码:
#![cfg(target_arch = "wasm32")]

extern crate wasm_bindgen_test;
use std::assert_eq;

use wasm_bindgen_test::*;
extern crate wasm_game_of_life;
use wasm_game_of_life::Universe;
wasm_bindgen_test_configure!(run_in_browser);

#[cfg(test)]
pub fn input_spaceship() -> Universe {
    let mut universe = Universe::new();
    universe.set_width(6);
    universe.set_height(6);
    universe.set_cells(&[(1, 2), (2, 3), (3, 1), (3, 2), (3, 3)]);
    universe
}

#[cfg(test)]
pub fn expected_spaceship() -> Universe {
    let mut universe = Universe::new();
    universe.set_width(6);
    universe.set_height(6);
    universe.set_cells(&[(2, 1), (2, 3), (3, 2), (3, 3), (4, 2)]);
    universe
}
#[wasm_bindgen_test]
pub fn test_tick() {
    // Let's create a smaller Universe with a small spaceship to test!
    let mut input_universe = input_spaceship();

    // This is what our spaceship should look like
    // after one tick in our universe.
    let expected_universe = expected_spaceship();

    // Call `tick` and then see if the cells in the `Universe`s are the same.
    input_universe.tick();
    assert_eq!(&input_universe.get_cells(), &expected_universe.get_cells());
}
- 然后使用
wasm-pack test --firefox --headless即可运行测试结果。如果安装浏览器失败,可以使用谷歌,或者去掉无头属性,直接网页上看测试结果。
调试
- 我们知道,web上使用console.log去输出调试内容,rust的代码如何在web中调试呢?
- 这里需要安装下web-sys
[dependencies.web-sys]
version = "0.3"
features = [
  "console",
]
- 导入外部websys,制作自定义宏:
extern crate web_sys;
// A macro to provide `println!(..)`-style syntax for `console.log` logging.
macro_rules! log {
    ( $( $t:tt )* ) => {
        web_sys::console::log_1(&format!( $( $t )* ).into());
    }
}
format宏与其他几个输出区别在于其使用write,不输出到标准输出中:
format!: write formatted text to String
print!: same as format! but the text is printed to the console (io::stdout).
println!: same as print! but a newline is appended.
eprint!: same as format! but the text is printed to the standard error (io::stderr).
eprintln!: same as eprint!but a newline is appended.
然后就可以在需要的地方console了,比如neighbours那:
 let live_neighbors = self.live_neighbor_count(row, col);
                log!(
                    "cell[{}, {}] is initially {:?} and has {} live neighbors",
                    row,
                    col,
                    cell,
                    live_neighbors
                );
                let next_cell = match (cell, live_neighbors) {
                    // Rule 1: Any live cell with fewer than two live neighbours
                    // dies, as if caused by underpopulation.
                    (Cell::Alive, x) if x < 2 => Cell::Dead,
                    // Rule 2: Any live cell with two or three live neighbours
                    // lives on to the next generation.
                    (Cell::Alive, 2) | (Cell::Alive, 3) => Cell::Alive,
                    // Rule 3: Any live cell with more than three live
                    // neighbours dies, as if by overpopulation.
                    (Cell::Alive, x) if x > 3 => Cell::Dead,
                    // Rule 4: Any dead cell with exactly three live neighbours
                    // becomes a live cell, as if by reproduction.
                    (Cell::Dead, 3) => Cell::Alive,
                    // All other cells remain in the same state.
                    (otherwise, _) => otherwise,
                };
                log!("    it becomes {:?}", next_cell);
                next[idx] = next_cell;
打开web,即可看见console的内容。
到此这篇关于使用Rust制作康威生命游戏的文章就介绍到这了,更多相关Rust康威生命游戏内容请搜索程序员之家以前的文章或继续浏览下面的相关文章希望大家以后多多支持程序员之家!
您可能感兴趣的文章:
相关文章
 这篇文章主要介绍了Rust?编程语言中的所有权ownership详解的相关资料,需要的朋友可以参考下2023-02-02
 HashMap在Rust中是一个强大的工具,通过合理使用可以简化很多与键值对相关的问题,在实际开发中,我们可以充分利用其特性,提高代码的效率和可读性,本文将深入介绍HashMap的特性,以及通过一个单词统计的例子展示其用法,感兴趣的朋友一起看看吧2024-02-02
 VS Code对Rust有着较完备的支持,这篇文章主要给大家介绍了关于使用vscode配置Rust运行环境的相关资料,文中通过图文介绍的非常详细,需要的朋友可以参考下2023-06-06
 在Rust中,可以使用lazy_static宏来声明可变的静态变量,lazy_static是一个用于声明延迟求值静态变量的宏,本文将通过一个简单的例子,演示如何使用?lazy_static?宏来声明一个可变的静态变量,需要的朋友可以参考下2023-08-08
 Rust并不像C++一样使用try?catch的异常机制来进行错误处理,他将错误分为可恢复错误和不可恢复错误两类,主要使用panic!宏和Result<T,E>类型来进行错误处理,这篇文章主要介绍了Rust错误处理简介,需要的朋友可以参考下2022-11-11
 into_owned是Rust语言中std::borrow::Cow 枚举的一个方法,into_owned确保了调用者获得数据的独立所有权,无论Cow之前是引用还是已经拥有数据,本文给大家介绍Rust 的 into_owned() 方法,感兴趣的的朋友跟随小编一起看看吧2024-03-03
 Rust?语言提供了跟其他系统编程语言相同的方式来控制你使用的内存,但拥有数据所有者在离开作用域后自动清除其数据的功能意味着你无须额外编写和调试相关的控制代码,这篇文章主要介绍了Rust中的所有权机制,需要的朋友可以参考下2022-10-10
 这篇文章主要介绍了Rust Aya 框架编写 eBPF 程序方法的相关资料,需要的朋友可以参考下2022-11-11
 枚举是 Rust 中非常重要的复合类型,也是最强大的复合类型之一,广泛用于属性配置、错误处理、分支流程、类型聚合等场景中,本文就来介绍一下Rust 枚举和模式匹配,感兴趣的可以了解一下2023-12-12
 这篇文章主要为大家介绍了rust交叉编译问题及报错解析,有需要的朋友可以借鉴参考下,希望能够有所帮助,祝大家多多进步,早日升职加薪2023-07-07


最新评论