


使用 .NET MAUI 开发 ChatGPT 客户端的流程
(福利推荐:你还在原价购买阿里云服务器?现在阿里云0.8折限时抢购活动来啦!4核8G企业云服务器仅2998元/3年,立即抢购>>>:9i0i.cn/aliyun)
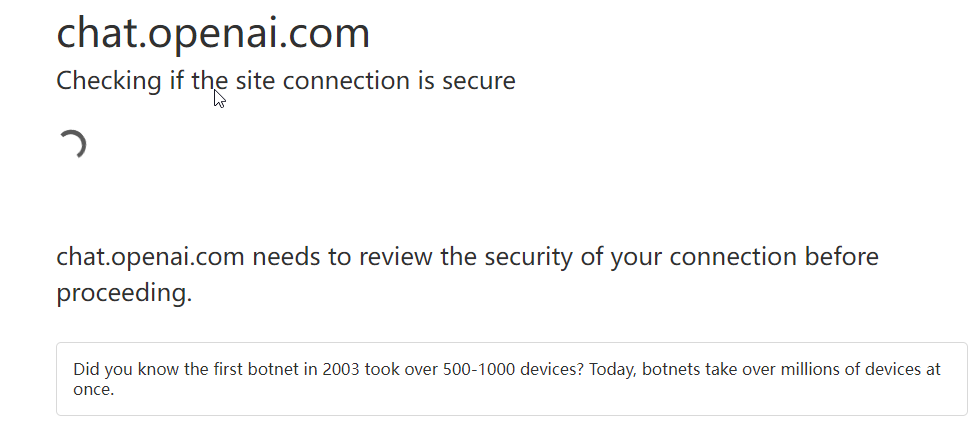
最近 chatgpt 很火,由于网页版本限制了 ip,还得必须开代理,用起来比较麻烦,所以我尝试用 maui 开发一个聊天小应用,结合 chatgpt 的开放 api 来实现(很多客户端使用网页版本接口用 cookie 的方式,有很多限制(如下图)总归不是很正规)。
效果如下

mac 端由于需要升级 macos13 才能开发调试,这部分我还没有完成,不过 maui 的控件是跨平台的,放在后续我升级系统再说。
开发实战
我是设想开发一个类似 jetbrains 的 ToolBox 应用一样,启动程序在桌面右下角出现托盘图标,点击图标弹出应用(风格在 windows mac 平台保持一致)
需要实现的功能一览
- 托盘图标(右键点击有 menu)
- webview(js 和 csharp 互相调用)
- 聊天 SPA 页面(react 开发,build 后让 webview 展示)
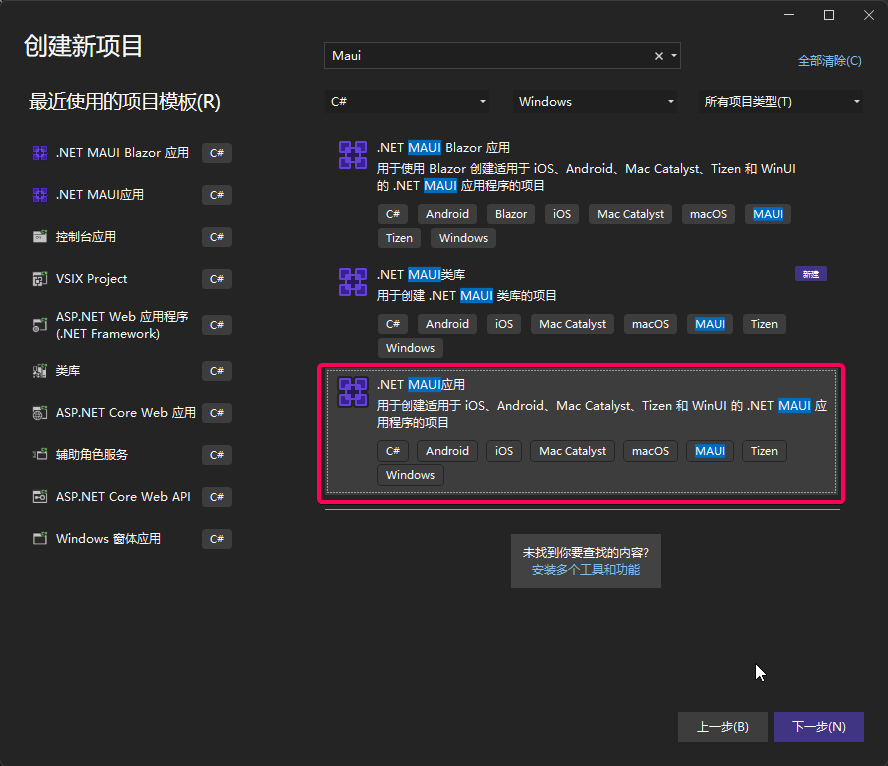
新建一个 maui 工程(vs2022)
坑一:默认编译出来的 exe 是直接双击打不开的

工程文件加上这个配置
<WindowsPackageType>None</WindowsPackageType>
<WindowsAppSDKSelfContained Condition="'$(IsUnpackaged)' == 'true'">true</WindowsAppSDKSelfContained>
<SelfContained Condition="'$(IsUnpackaged)' == 'true'">true</SelfContained>
以上修改后,编译出来的 exe 双击就可以打开了
托盘图标(右键点击有 menu)
启动时设置窗口不能改变大小,隐藏 titlebar, 让 Webview 控件占满整个窗口

这里要根据平台不同实现不同了,windows 平台采用 winAPI 调用,具体看工程代码吧!
WebView
在 MainPage.xaml 添加控件

对应的静态 html 等文件放在工程的 Resource\Raw 文件夹下 (整个文件夹里面默认是作为内嵌资源打包的,工程文件里面的如下配置起的作用)
<!-- Raw Assets (also remove the "Resources\Raw" prefix) -->
<MauiAsset Include="Resources\Raw\**" LogicalName="%(RecursiveDir)%(Filename)%(Extension)" />

【重点】js 和 csharp 互相调用
这部分我找了很多资料,最终参考了这个 demo,然后改进了下。
主要原理是:
- js 调用 csharp 方法前先把数据存储在 localstorage 里
- 然后 windows.location 切换特定的 url 发起调用,返回一个 promise,等待 csharp 的事件
- csharp 端监听 webview 的 Navigating 事件,异步进行下面处理
- 根据 url 解析出来 localstorage 的 key
- 然后 csharp 端调用 excutescript 根据 key 拿到 localstorage 的 value
- 进行逻辑处理后返回通过事件分发到 js 端
js 的调用封装如下:
// 调用csharp的方法封装
export default class CsharpMethod {
  constructor(command, data) {
    this.RequestPrefix = "request_csharp_";
    this.ResponsePrefix = "response_csharp_";
    // 唯一
    this.dataId = this.RequestPrefix + new Date().getTime();
    // 调用csharp的命令
    this.command = command;
    // 参数
    this.data = { command: command, data: !data ? '' : JSON.stringify(data), key: this.dataId }
  }

  // 调用csharp 返回promise
  call() {
    // 把data存储到localstorage中 目的是让csharp端获取参数
    localStorage.setItem(this.dataId, this.utf8_to_b64(JSON.stringify(this.data)));
    let eventKey = this.dataId.replace(this.RequestPrefix, this.ResponsePrefix);
    let that = this;
    const promise = new Promise(function (resolve, reject) {
      const eventHandler = function (e) {
        window.removeEventListener(eventKey, eventHandler);
        let resp = e.newValue;
        if (resp) {
          // 从base64转换
          let realData = that.b64_to_utf8(resp);
          if (realData.startsWith('err:')) {
            reject(realData.substr(4));
          } else {
            resolve(realData);
          }
        } else {
          reject("unknown error :" + eventKey);
        }
      };
      // 注册监听回调(csharp端处理完发起的)
      window.addEventListener(eventKey, eventHandler);
    });
    // 改变location 发送给csharp端
    window.location = "/api/" + this.dataId;
    return promise;
  }

  // 转成base64 解决中文乱码
  utf8_to_b64(str) {
    return window.btoa(unescape(encodeURIComponent(str)));
  }
  // 从base64转过来 解决中文乱码
  b64_to_utf8(str) {
    return decodeURIComponent(escape(window.atob(str)));
  }

}
前端的使用方式
import CsharpMethod from '../../services/api'

// 发起调用csharp的chat事件函数
const method = new CsharpMethod("chat", {msg: message});
method.call() // call返回promise
.then(data =>{
  // 拿到csharp端的返回后展示
  onMessageHandler({
    message: data,
    username: 'Robot',
    type: 'chat_message'
  });
}).catch(err =>  {
    alert(err);
});
csharp 端的处理:

这么封装后,js 和 csharp 的互相调用就很方便了。
chatgpt 的开放 api 调用
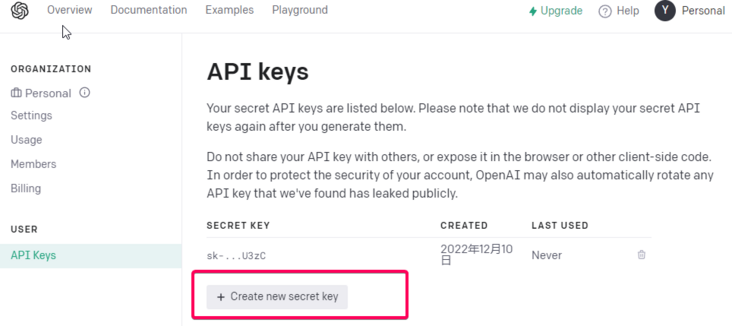
注册好 chatgpt 后可以申请一个 APIKEY。
API 封装:
  public static async Task<CompletionsResponse> GetResponseDataAsync(string prompt)
        {
            // Set up the API URL and API key
            string apiUrl = "https://api.openai.com/v1/completions";

            // Get the request body JSON
            decimal temperature = decimal.Parse(Setting.Temperature, CultureInfo.InvariantCulture);
            int maxTokens = int.Parse(Setting.MaxTokens, CultureInfo.InvariantCulture);
            string requestBodyJson = GetRequestBodyJson(prompt, temperature, maxTokens);

            // Send the API request and get the response data
            return await SendApiRequestAsync(apiUrl, Setting.ApiKey, requestBodyJson);
        }

        private static string GetRequestBodyJson(string prompt, decimal temperature, int maxTokens)
        {
            // Set up the request body
            var requestBody = new CompletionsRequestBody
            {
                Model = "text-davinci-003",
                Prompt = prompt,
                Temperature = temperature,
                MaxTokens = maxTokens,
                TopP = 1.0m,
                FrequencyPenalty = 0.0m,
                PresencePenalty = 0.0m,
                N = 1,
                Stop = "[END]",
            };

            // Create a new JsonSerializerOptions object with the IgnoreNullValues and IgnoreReadOnlyProperties properties set to true
            var serializerOptions = new JsonSerializerOptions
            {
                IgnoreNullValues = true,
                IgnoreReadOnlyProperties = true,
            };

            // Serialize the request body to JSON using the JsonSerializer.Serialize method overload that takes a JsonSerializerOptions parameter
            return JsonSerializer.Serialize(requestBody, serializerOptions);
        }

        private static async Task<CompletionsResponse> SendApiRequestAsync(string apiUrl, string apiKey, string requestBodyJson)
        {
            // Create a new HttpClient for making the API request
            using HttpClient client = new HttpClient();

            // Set the API key in the request headers
            client.DefaultRequestHeaders.Add("Authorization", "Bearer " + apiKey);

            // Create a new StringContent object with the JSON payload and the correct content type
            StringContent content = new StringContent(requestBodyJson, Encoding.UTF8, "application/json");

            // Send the API request and get the response
            HttpResponseMessage response = await client.PostAsync(apiUrl, content);

            // Deserialize the response
            var responseBody = await response.Content.ReadAsStringAsync();

            // Return the response data
            return JsonSerializer.Deserialize<CompletionsResponse>(responseBody);
        }
调用方式
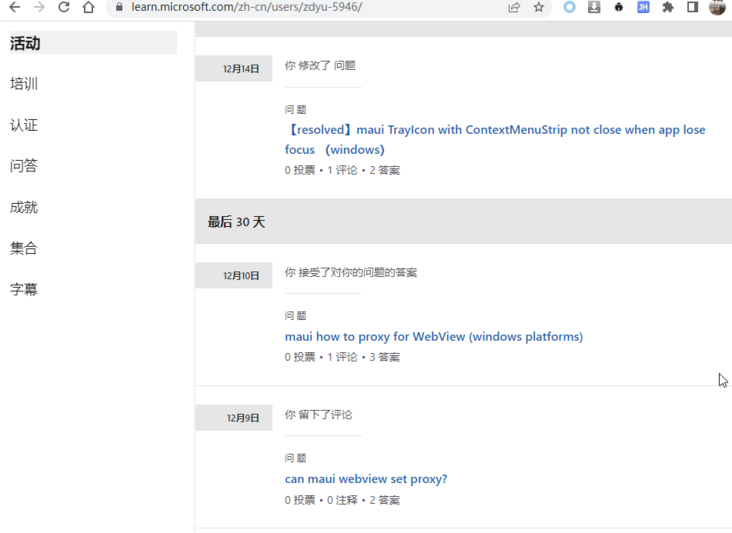
var reply = await ChatService.GetResponseDataAsync('xxxxxxxxxx');在学习 maui 的过程中,遇到问题我在 Microsoft Learn 提问,回答的效率很快,推荐大家试试看!
到此这篇关于使用 .NET MAUI 开发 ChatGPT 客户端的文章就介绍到这了,更多相关.NET MAUI 开发 ChatGPT 内容请搜索程序员之家以前的文章或继续浏览下面的相关文章希望大家以后多多支持程序员之家!
相关文章
 ASP.NET?CORE应用针对IIS具有两种部署模式,它们都依赖于一个IIS针对ASP.NET?CORE?Core的扩展模块,本文给大家介绍下IIS在ASP.NET?Core下的两种部署模式,感兴趣的朋友一起看看吧2022-03-03
 这篇文章主要为大家详细介绍了MVC4制作网站教程,用户密码修改功能的实现代码,具有一定的参考价值,感兴趣的小伙伴们可以参考一下2016-08-08
 这篇文章主要为大家详细介绍了ASP.NET/C#中如何调用动态链接库DLL,感兴趣的小伙伴们可以参考一下2016-03-03
 本文介绍WPF应用程序实现在屏幕上显示一行或多行文字通知。它没有标题栏和最大化最小化等按钮,可以有半透明背景以使文字的显示更清晰,鼠标点击后提示消失。2013-07-07
基于ASP.NET+EasyUI框架实现图片上传提交表单功能(js提交图片)
这篇文章主要介绍了基于ASP.NET+EasyUI框架实现图片上传再提交表单(js提交图片)的相关资料,需要的朋友可以参考下2016-06-06 这篇文章主要为大家介绍了ASP.NET Core中间件会话状态读写及生命周期示例,有需要的朋友可以借鉴参考下,希望能够有所帮助,祝大家多多进步,早日升职加薪2022-04-04
 Web站点的风格切换是很常见、也很受大家欢迎的功能,比如大家熟知的博客园就提供了几十款风格模板供大家选择。2009-05-05
 这篇文章介绍了ASP.NET弹出日历功能的实现方法,有需要的朋友可以参考一下。2016-10-10
详解ASP.NET MVC下的异步Action的定义和执行原理
这篇文章主要介绍了详解ASP.NET MVC下的异步Action的定义和执行原理,小编觉得挺不错的,现在分享给大家,也给大家做个参考。一起跟随小编过来看看吧2016-12-12
C#中OpenFileDialog和PictrueBox的用法分析
这篇文章主要介绍了C#中OpenFileDialog和PictrueBox的用法,以实例的形式较为详细的分析了OpenFileDialog和PictrueBox使用时的注意事项与具体用法,具有一定的参考借鉴价值,需要的朋友可以参考下2014-11-11


最新评论