


iOS实现简单分栏效果
更新时间:2022年03月21日 12:01:08 作者:小溪彼岸
这篇文章主要为大家详细介绍了iOS实现简单分栏效果,文中示例代码介绍的非常详细,具有一定的参考价值,感兴趣的小伙伴们可以参考一下
(福利推荐:【腾讯云】服务器最新限时优惠活动,云服务器1核2G仅99元/年、2核4G仅768元/3年,立即抢购>>>:9i0i.cn/qcloud)
(福利推荐:你还在原价购买阿里云服务器?现在阿里云0.8折限时抢购活动来啦!4核8G企业云服务器仅2998元/3年,立即抢购>>>:9i0i.cn/aliyun)
本文实例为大家分享了iOS实现简单分栏效果的具体代码,供大家参考,具体内容如下
直接贴代码喽
GMSubfieldViiew.h
#import <UIKit/UIKit.h>

@interface GMSubfieldViiew : UIView

/**
?* select index
?*/
@property(nonatomic,copy) void(^clickIndex)(NSInteger index);

- (instancetype)initWithFrame:(CGRect)frame titles:(NSArray *)thiTitles;

/**
?* ?默认勾选
?*/
@property(nonatomic,assign) NSInteger selectedIndex;

@end
GMSubfieldViiew.m
#import "GMSubfieldViiew.h"

#define lineH 2
@interface GMSubfieldViiew ()
/**
?* ?titles
?*/
@property(nonatomic,strong) NSArray * titles;
/**
?* ?lineView
?*/
@property(nonatomic,weak) UIView *lineView;
/**
?* ?itemWidth
?*/
@property(nonatomic,assign) CGFloat itemWidth;
@end

@implementation GMSubfieldViiew


#pragma mark - initUI
- (instancetype)initWithFrame:(CGRect)frame titles:(NSArray *)thiTitles
{
? ? if (self = [super initWithFrame:frame]) {
? ? ? ? self.titles = thiTitles;
? ? ? ? //initSubViews
? ? ? ? [self initSubViews];
? ? }
? ? return self;
}

#pragma mark - action
- (void) initSubViews
{
? ? self.itemWidth = kScreen_Width/self.titles.count;
? ? //add child
? ? for (int i=0; i<self.titles.count; i++) {
? ? ? ? UIButton *btn = [UIButton buttonWithType:UIButtonTypeCustom];
? ? ? ? [btn setTitle:self.titles[i] forState:UIControlStateNormal];
? ? ? ? btn.titleLabel.font = FontSize(15);
? ? ? ? btn.tag ?= 100+i;
? ? ? ? btn.layer.borderWidth = 0.5;
? ? ? ? [btn setTitleColor:[UIColor blackColor] forState:UIControlStateNormal];
? ? ? ? btn.layer.borderColor = [UIColor lightGrayColor].CGColor;
? ? ? ? [btn addTarget:self action:@selector(btnClick:) forControlEvents:UIControlEventTouchUpInside];
? ? ? ? [self addSubview:btn];
? ? }

? ? //添加下划线
? ? UIView *lineView ?= [[UIView alloc]init];
? ? lineView.backgroundColor = [UIColor blackColor];
? ? [self addSubview:lineView];
? ? self.lineView ? ? = lineView;
}

- (void)layoutSubviews
{
? ? [super layoutSubviews];

? ? for (int i=0; i<self.titles.count; i++) {
? ? ? ? UIButton *btn = [self viewWithTag:100+i];
? ? ? ? btn.frame = CGRectMake(i*self.itemWidth, 0, self.itemWidth, self.bounds.size.height-lineH+1);
? ? }
? ? self.lineView.frame = CGRectMake(self.selectedIndex*self.itemWidth, self.bounds.size.height-lineH, self.itemWidth, lineH);
}


- (void) btnClick:(UIButton *)btn
{
? ? NSInteger index = btn.tag -100;
? ? ESWeakSelf
? ? [UIView animateWithDuration:0.2 animations:^{
? ? ? ? ESStrongSelf
? ? ? ? self.lineView.frame = CGRectMake(index*self.itemWidth, self.bounds.size.height-lineH, self.itemWidth, lineH);
? ? }];
? ? if (self.clickIndex) {
? ? ? ? self.clickIndex(index);
? ? }
}

/*
// Only override drawRect: if you perform custom drawing.
// An empty implementation adversely affects performance during animation.
- (void)drawRect:(CGRect)rect {
? ? // Drawing code
}
*/

@end
调用:
GMSubfieldViiew *segView = [[GMSubfieldViiew alloc]initWithFrame:CGRectMake(0, 10, kScreen_Width, segH) titles:@[@"未还",@"已还"]];
? ? segView.selectedIndex = 1;
? ? ESWeakSelf
? ? segView.clickIndex = ^(NSInteger index){
? ? ? ? self.isHK = NO;
? ? ? ? ESStrongSelf
? ? ? ? if(index==0){
? ? ? ? ? ? //未还
? ? ? ? ? ? self.rightButton.hidden = NO;
? ? ? ? }
? ? ? ? else if(index==1){
? ? ? ? ? ?//已还
? ? ? ? ? ? self.rightButton.hidden = YES;
? ? ? ? ? ? self.containView.hidden = YES;
? ? ? ? }
? ? ? ? self.tableView.frame = CGRectMake(0, 60, kScreen_Width, kScreen_Height-NavHeight-60);
? ? ? ? [self.tableView reloadData];
? ? };
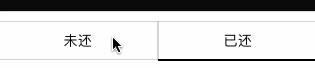
? ?[self.view addSubView:segView];效果图:
以上就是本文的全部内容,希望对大家的学习有所帮助,也希望大家多多支持程序员之家。
您可能感兴趣的文章:
相关文章
 这篇文章主要介绍了IOS 静态库打包流程简化详细介绍的相关资料,开发好的静态库后需要手动的合并.a文件,然后再拷贝相关的头文件,接着把静态库和头文件放在同一个文件里面打包发送给SDK的使用者,这里简化下流程,需要的朋友可以参考下2016-12-12
 点击发送验证码button。倒计时开始,这篇文章就为大家详细介绍了iOS发送验证码倒计时应用的实现方法,具有一定的参考价值,感兴趣的小伙伴们可以参考一下2016-12-12
 下面小编就为大家带来一篇safari cookie设置中文失败的解决方法。小编觉得挺不错的,现在就分享给大家,也给大家做个参考。一起跟随小编过来看看吧2016-08-08
 本篇文章主要利用iOS动画来模拟音量振动条的实现以及对CAReplicatorLayer的简单介绍,需要的朋友可以参考下2015-07-07
 大家可能都知道,在开发过程中我们总会遇到各种各样的小问题,有些小问题并不是十分容易解决。在此我就总结一下,我在开发中遇到的各种小问题,以及我的解决方法,也算是些小技巧吧,分享给大家,方便大家在iOS开发的时候能够参考借鉴,下面有需要的朋友一起来看看吧。2016-11-11
 这篇文章主要介绍了IOS Cache设计详细介绍及简单示例的相关资料,Cache的目的是为了追求更高的速度体验,Cache的源头是两种数据读取方式在成本和性能上的差异,需要的朋友可以参考下2017-01-01
 这篇文章主要介绍了iOS App中调用相册中图片及获取最近的一张图片的方法,示例代码为传统的Objective-C语言,需要的朋友可以参考下2016-03-03
 这篇文章主要给大家介绍了关于iOS自定义字体设置和系统自带的字体的相关资料,文中通过示例代码介绍的非常详细,对大家的学习或者工作具有一定的参考学习价值,需要的朋友们下面随着小编来一起学习学习吧2019-01-01
 这篇文章主要给大家介绍了关于iOS设置圆角的4种方法,并给大家附上了性能评测,文中通过示例代码介绍的非常详细,对大家的学习或者工作具有一定的参考学习价值,需要的朋友们下面随着小编来一起学习学习吧2019-01-01
 这篇文章主要介绍了IOS中UITableView滚动到指定位置的实现方法,本文介绍的非常详细,具有参考借鉴价值,需要的朋友可以参考下2016-09-09


最新评论