


Swift实现表格视图单元格单选(2)
(福利推荐:你还在原价购买阿里云服务器?现在阿里云0.8折限时抢购活动来啦!4核8G企业云服务器仅2998元/3年,立即抢购>>>:9i0i.cn/aliyun)
本文实例为大家分享了Swift实现表格视图单元格单选的具体代码,供大家参考,具体内容如下
效果
前言
前段时间写了一篇博客: 表格视图单元格单选(一),实现起来并不复杂,简单易懂。在实际开发中,可能会涉及到更为复杂的操作,比如多个section 下的单选,如上面展示的效果,当我们有这样的需求的时候,该如何实现呢?因为,在上篇文章中我所用的控件都是单元格自带的imageView以及textLabel,本文我将主要分享自定义选择按钮以及在多个section下实现单选的方法。
准备
界面搭建与数据显示
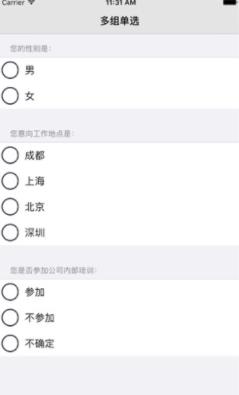
这样的界面相信对大家而言,并不难,这里我不再做详细的讲解,值得一提的是数据源的创建,每一组的头部标题,我用一个数组questions存储,类型为:[String]?,由于每一组中,单元格内容不一致,因此建议用字典存储。如下所示:
var questions: [String]?
var answers: ? [String:[String]]?
如果我用字典来存储数据,那字典的键我应该如何赋值呢?其实很简单,我们只需将section的值作为key 就Ok了,这样做的好处在于,我可以根据用户点击的 section来处理对应的数据,我们知道,表格视图的section 从 0 开始,因此字典赋值可以像下面提供的代码一样赋值,但要注意,answers的值需与questions里面的问题一致,才能满足实际的需求。
self.questions = ["您的性别是:",
? ? ? ? ? ? ? ? ? "您意向工作地点是:",
? ? ? ? ? ? ? ? ? "您是否参加公司内部培训:"]

self.answers = ["0":["男", "女"],
? ? ? ? ? ? ? ? "1":["成都", "上海", "北京", "深圳"],
? ? ? ? ? ? ? ? "2":["参加", "不参加","不确定"]]
接下来需要做的事情就是自定义单元格(UITableViewCell)了,比较简单,直接上代码,代码中涉及到的图片素材可到阿里矢量图中下载:
import UIKit

class CustomTableViewCell: UITableViewCell {

? ? var choiceBtn: UIButton?
? ? var displayLab: UILabel?

? ? override init(style: UITableViewCellStyle, reuseIdentifier: String?) {
? ? ? ? super.init(style: style, reuseIdentifier: reuseIdentifier)

? ? ? ? self.initializeUserInterface()

? ? }

? ? required init?(coder aDecoder: NSCoder) {
? ? ? ? fatalError("init(coder:) has not been implemented")
? ? }

? ? // MARK:Initialize methods
? ? func initializeUserInterface() {

? ? ? ? self.choiceBtn = {
? ? ? ? ? ? let choiceBtn = UIButton(type: UIButtonType.Custom)
? ? ? ? ? ? choiceBtn.bounds = CGRectMake(0, 0, 30, 30)
? ? ? ? ? ? choiceBtn.center = CGPointMake(20, 22)
? ? ? ? ? ? choiceBtn.setBackgroundImage(UIImage(named: "iconfont-select.png"), forState: UIControlState.Normal)
? ? ? ? ? ? choiceBtn.setBackgroundImage(UIImage(named: "iconfont-selected.png"), forState: UIControlState.Selected)
? ? ? ? ? ? choiceBtn.addTarget(self, action: Selector("respondsToButton:"), forControlEvents: UIControlEvents.TouchUpInside)
? ? ? ? ? ? return choiceBtn
? ? ? ? ? ? }()
? ? ? ? self.contentView.addSubview(self.choiceBtn!)

? ? ? ? self.displayLab = {
? ? ? ? ? ? let displayLab = UILabel()
? ? ? ? ? ? displayLab.bounds = CGRectMake(0, 0, 100, 30)
? ? ? ? ? ? displayLab.center = CGPointMake(CGRectGetMaxX(self.choiceBtn!.frame) + 60, CGRectGetMidY(self.choiceBtn!.frame))
? ? ? ? ? ? displayLab.textAlignment = NSTextAlignment.Left
? ? ? ? ? ? return displayLab
? ? ? ? ? ? }()
? ? ? ? self.contentView.addSubview(self.displayLab!)

? ? }

? ? // MARK:Events
? ? func respondsToButton(sender: UIButton) {

? ? }
}
表格视图数据源与代理的实现,如下所示:
// MARK:UITableViewDataSource && UITableViewDelegate

func numberOfSectionsInTableView(tableView: UITableView) -> Int {
? ? // 直接返回 answers 键值对个数即可,也可返回 questions 个数;
? ? return (self.answers!.count)
}

func tableView(tableView: UITableView, numberOfRowsInSection section: Int) -> Int {

? ? // 根据 section 获取对应的 key
? ? let key = "\(section)"
? ? // 根据 key 获取对应的数据(数组)
? ? let answers = self.answers![key]
? ? // 直接返回数据条数,就是需要的行数
? ? return answers!.count
}

func tableView(tableView: UITableView, cellForRowAtIndexPath indexPath: NSIndexPath) -> UITableViewCell {
? ? var cell: CustomTableViewCell? = tableView.dequeueReusableCellWithIdentifier("cell") as? CustomTableViewCell

? ? if cell == nil {
? ? ? ? cell = CustomTableViewCell(style: UITableViewCellStyle.Default, reuseIdentifier: "cell")
? ? }

? ? let key = "\(indexPath.section)"
? ? let answers = self.answers![key]


? ? cell!.selectionStyle = UITableViewCellSelectionStyle.None

? ? return cell!
}

func tableView(tableView: UITableView, heightForHeaderInSection section: Int) -> CGFloat {
? ? return 40
}

func tableView(tableView: UITableView, titleForHeaderInSection section: Int) -> String? {
? ? return self.questions![section]
}
实现
技术点:在这里我主要会用到闭包回调,在自定义的单元格中,用户点击按钮触发方法时,闭包函数会被调用,并将用户点击的单元格的indexPath进行传递,然后根据indexPath进行处理,具体的实现方式,下面会慢慢讲到,闭包类似于Objective-C中的Block,有兴趣的朋友可深入了解Swift中的闭包使用。
首先,我们需要在CustomTableViewCell.swift文件中,声明一个闭包类型:
typealias IndexPathClosure = (indexPath: NSIndexPath) ->Void
其次,声明一个闭包属性:
var indexPathClosure: IndexPathClosure?
现在,要做的事情就是声明一个闭包函数了,闭包函数主要用于在ViewController.swift文件中调用并且将需要传递的数据传递到ViewController.swift文件中。
func getIndexWithClosure(closure: IndexPathClosure?) {
? ? ? ? self.indexPathClosure = closure
? ? }闭包函数已经有了,那么何时调用闭包函数呢?当用户点击单元格的时候,闭包函数会被调用,因此,我们只需要到选择按钮触发方法中去处理逻辑就好了,在触发方法中,我们需要将单元格的indexPath属性传递出去,但是,UITableViewCell并无indexPath属性,那应该怎么办呢?我们可以为它创建一个indexPath属性,在配置表格视图协议方法cellForRowAtIndexPath:时,我们赋值单元格的indexPath属性就OK了。
var indexPath: NSIndexPath?
func respondsToButton(sender: UIButton) {
? ? sender.selected = true
? ? if self.indexPathClosure != nil {
? ? ? ? self.indexPathClosure!(indexPath: self.indexPath!)
? ? }
}现在在CustomTableViewCell.swift文件里面的操作就差不多了,但是,还缺少一步,我还需要定制一个方法,用于设置按钮的状态:
func setChecked(checked: Bool) {

? ? self.choiceBtn?.selected = checked

}到了这一步,我们要做的事情就是切换到ViewController.swift文件中,找到表格视图协议方法cellForRowAtIndexPath:,主要的逻辑就在这个方法中处理,首先我们需要做的事情就是赋值自定义单元格的indexPath属性:
cell?.indexPath = indexPath
其次,我需要在ViewController.swift文件中,声明一个selectedIndexPath属性用于记录用户当前选中的单元格位置:
var selectedIndexPath: NSIndexPath?
接下来我会去做一个操作,判断协议方法参数indexPath.row,是否与selectedIndexPath.row一致,如果一致,则设为选中,否则设为未选中,这里可用三目运算符:
self.selectedIndexPath?.row == indexPath.row ? cell?.setChecked(true) : cell?.setChecked(false)
这里大家可能会有疑问,那就是为什么只判断row呢?不用判断section吗?当然不用,因为在刷新表格视图的时候我并没有调用reloadData方法,而是指定刷新某一组(section)就可以了,如果全部刷新,则无法保留上一组用户选择的信息,这将不是我们所需要的。
接下来,将是最后一步,调用回调方法,该方法会在每一次用户点击单元格的时候调用,并且返回用户当前点击的单元格的indexPath,在这里,我们需要将返回的indexPath赋值给selectedIndexPath属性。并且刷新指定section就OK了,代码如下:
cell!.getIndexWithClosure { (indexPath) -> Void in

? ? self.selectedIndexPath = indexPath
? ? print("您选择的答案是:\(answers![indexPath.row])")

? ? tableView.reloadSections(NSIndexSet(index: self.selectedIndexPath!.section), withRowAnimation: UITableViewRowAnimation.Automatic) ??
}
完整代码
可能大家还比较模糊,这里我将贴上完整的代码供大家参考
ViewController.swift文件
import UIKit

class ViewController: UIViewController, UITableViewDataSource, UITableViewDelegate{

? ? var tableView: UITableView?
? ? var questions: [String]?
? ? var answers: [String:[String]]?


? ? var selectedIndexPath: NSIndexPath?

? ? override func viewDidLoad() {
? ? ? ? super.viewDidLoad()
? ? ? ? self.initializeDatasource()
? ? ? ? self.initializeUserInterface()
? ? ? ? // Do any additional setup after loading the view, typically from a nib.
? ? }

? ? // MARK:Initialize methods
? ? func initializeDatasource() {
? ? ? ? self.questions = ["您的性别是:", "您意向工作地点是:", "您是否参加公司内部培训:"]

? ? ? ? self.answers = ["0":["男", "女"],
? ? ? ? ? ? ? ? ? ? ? ? "1":["成都", "上海", "北京", "深圳"],
? ? ? ? ? ? ? ? ? ? ? ? "2":["参加","不参加","不确定"]]

? ? }

? ? func initializeUserInterface() {
? ? ? ? self.title = "多组单选"
? ? ? ? self.automaticallyAdjustsScrollViewInsets = false

? ? ? ? // table view
? ? ? ? self.tableView = {
? ? ? ? ? ? let tableView = UITableView(frame: CGRectMake(0, 64, CGRectGetWidth(self.view.bounds), CGRectGetHeight(self.view.bounds)), style: UITableViewStyle.Grouped)
? ? ? ? ? ? tableView.dataSource = self
? ? ? ? ? ? tableView.delegate = self
? ? ? ? ? ? return tableView
? ? ? ? ? ? }()
? ? ? ? self.view.addSubview(self.tableView!)

? ? }

? ? // MARK:UITableViewDataSource && UITableViewDelegate

? ? func numberOfSectionsInTableView(tableView: UITableView) -> Int {
? ? ? ? return (self.answers!.count)
? ? }

? ? func tableView(tableView: UITableView, numberOfRowsInSection section: Int) -> Int {

? ? ? ? let key = "\(section)"
? ? ? ? let answers = self.answers![key]
? ? ? ? return answers!.count
? ? }

? ? func tableView(tableView: UITableView, cellForRowAtIndexPath indexPath: NSIndexPath) -> UITableViewCell {
? ? ? ? var cell: CustomTableViewCell? = tableView.dequeueReusableCellWithIdentifier("cell") as? CustomTableViewCell

? ? ? ? if cell == nil {
? ? ? ? ? ? cell = CustomTableViewCell(style: UITableViewCellStyle.Default, reuseIdentifier: "cell")
? ? ? ? }

? ? ? ? cell?.indexPath = indexPath

? ? ? ? let key = "\(indexPath.section)"
? ? ? ? let answers = self.answers![key]

? ? ? ? self.selectedIndexPath?.row == indexPath.row ? cell?.setChecked(true) : cell?.setChecked(false)

? ? ? ? cell!.getIndexWithClosure { (indexPath) -> Void in

? ? ? ? ? ? self.selectedIndexPath = indexPath

? ? ? ? ? ? print("您选择的答案是:\(answers![indexPath.row])")

? ? ? ? ? ? tableView.reloadSections(NSIndexSet(index: self.selectedIndexPath!.section), withRowAnimation: UITableViewRowAnimation.Automatic)

? ? ? ? }

? ? ? ? cell!.displayLab?.text = answers![indexPath.row]
? ? ? ? cell!.selectionStyle = UITableViewCellSelectionStyle.None

? ? ? ? return cell!
? ? }

? ? func tableView(tableView: UITableView, heightForHeaderInSection section: Int) -> CGFloat {
? ? ? ? return 40
? ? }

? ? func tableView(tableView: UITableView, titleForHeaderInSection section: Int) -> String? {
? ? ? ? return self.questions![section]
? ? }

}
CustomTableViewCell.swift文件
import UIKit

typealias IndexPathClosure = (indexPath: NSIndexPath) ->Void

class CustomTableViewCell: UITableViewCell {

? ? var choiceBtn: UIButton?
? ? var displayLab: UILabel?

? ? var indexPath: NSIndexPath?

? ? var indexPathClosure: IndexPathClosure?

? ? override init(style: UITableViewCellStyle, reuseIdentifier: String?) {
? ? ? ? super.init(style: style, reuseIdentifier: reuseIdentifier)

? ? ? ? self.initializeUserInterface()

? ? }

? ? required init?(coder aDecoder: NSCoder) {
? ? ? ? fatalError("init(coder:) has not been implemented")
? ? }

? ? // MARK:Initialize methods
? ? func initializeUserInterface() {

? ? ? ? self.choiceBtn = {
? ? ? ? ? ? let choiceBtn = UIButton(type: UIButtonType.Custom)
? ? ? ? ? ? choiceBtn.bounds = CGRectMake(0, 0, 30, 30)
? ? ? ? ? ? choiceBtn.center = CGPointMake(20, 22)
? ? ? ? ? ? choiceBtn.setBackgroundImage(UIImage(named: "iconfont-select"), forState: UIControlState.Normal)
? ? ? ? ? ? choiceBtn.setBackgroundImage(UIImage(named: "iconfont-selected"), forState: UIControlState.Selected)
? ? ? ? ? ? choiceBtn.addTarget(self, action: Selector("respondsToButton:"), forControlEvents: UIControlEvents.TouchUpInside)
? ? ? ? ? ? return choiceBtn
? ? ? ? ? ? }()
? ? ? ? self.contentView.addSubview(self.choiceBtn!)

? ? ? ? self.displayLab = {
? ? ? ? ? ? let displayLab = UILabel()
? ? ? ? ? ? displayLab.bounds = CGRectMake(0, 0, 100, 30)
? ? ? ? ? ? displayLab.center = CGPointMake(CGRectGetMaxX(self.choiceBtn!.frame) + 60, CGRectGetMidY(self.choiceBtn!.frame))
? ? ? ? ? ? displayLab.textAlignment = NSTextAlignment.Left
? ? ? ? ? ? return displayLab
? ? ? ? ? ? }()
? ? ? ? self.contentView.addSubview(self.displayLab!)

? ? }

? ? // MARK:Events
? ? func respondsToButton(sender: UIButton) {
? ? ? ? sender.selected = true
? ? ? ? if self.indexPathClosure != nil {
? ? ? ? ? ? self.indexPathClosure!(indexPath: self.indexPath!)
? ? ? ? }
? ? }


? ? // MARK:Private
? ? func setChecked(checked: Bool) {

? ? ? ? self.choiceBtn?.selected = checked

? ? }

? ? func getIndexWithClosure(closure: IndexPathClosure?) {
? ? ? ? self.indexPathClosure = closure
? ? }
}
以上就是本文的全部内容,希望对大家的学习有所帮助,也希望大家多多支持程序员之家。
相关文章

RxSwift发送及订阅 Subjects、Variables代码示例
这篇文章主要介绍了RxSwift发送及订阅 Subjects、Variables代码示例,文中通过示例代码介绍的非常详细,对大家的学习或者工作具有一定的参考学习价值,需要的朋友可以参考下2020-12-12 这篇文章主要介绍了swift 字符串String的使用方法的相关资料,需要的朋友可以参考下2017-06-06
 绝大多数公司选择Swift语言开发iOS应用,主要原因是因为Swift相比Objc有更快的运行效率,更加安全的类型检测,更多现代语言的特性提升开发效率;这一系列的优点使Swift语言的热度越来越高。2020-10-10
 这篇文章主要介绍了Swift-方法调度-类的普通方法底层探究,本文给大家介绍的非常详细,对大家的学习或工作具有一定的参考借鉴价值,需要的朋友可以参考下2021-11-11
 这是我在网上上看到的答案,复制粘贴过来和大家分享一下,因为我和很多人一样很关心Swift的出现对Mac开发的影响和对Objective-C的影响。2014-09-09
 这篇文章主要介绍了Swift中的常量和变量简单概述的相关资料,非常具有参考借鉴价值,感兴趣的朋友一起学习吧2016-05-05
 这篇文章主要介绍了Swift与C语言指针结合使用实例,本文讲解了用以输入/输出的参数指针、作为数组使用的参数指针、用作字符串参数的指针、指针参数转换的安全性等内容,需要的朋友可以参考下2015-05-05
Swift Access Control访问控制与断言详细介绍
这篇文章主要介绍了Swift Access Control访问控制与断言,文中通过示例代码介绍的非常详细,对大家的学习或者工作具有一定的参考学习价值,需要的朋友们下面随着小编来一起学习学习吧2022-09-09 这篇文章主要为大家详细介绍了swift实现webview加载网页进度条效果,具有一定的参考价值,感兴趣的小伙伴们可以参考一下2017-11-11
 这篇文章主要介绍了Swift教程之集合类型详解,Swift 提供两种集合类型来存储集合,数组和字典,本文详细讲解了数组的创建、读取和修改数组、遍历数组以及集合的操作等内容,需要的朋友可以参考下2015-01-01


最新评论